

Android is an operating system with Linux as its core or kernel. Although Android is Linux, some functions are limited, such as accessing the root directory to make changes to the system.
This is because Android security is a top priority, where phones with the Android OS are used daily and carried everywhere. It would be very dangerous if someone who is not a technology expert accidentally changed the system on their phone.
Brief Explanation of Linux
Linux is an open-source operating system just like Windows and Mac OS. The operating system itself has the ability to communicate between software and hardware. For example, a processor outputs input that will be received to be displayed on a monitor hardware.
Linux has been around since the 90s and is now spread everywhere around humans. Starting from computers, smartphones, smartwatches, cars, and maybe even refrigerators.
Why Install Linux Distro on Android?
As we mentioned at the beginning of the article, although Android is a Linux operating system, it has various functional limitations. To overcome these limitations, we have to root first, but this is very risky for the security of the Android phone itself.
But thanks to rapid technological developments, we can now install Linux distros on Android without rooting. This way, Android phones remain secure, but Linux functions can be used.
With a Linux distro installed on Android, we can do many things such as:
- Hacking: not all hacking activities are bad, one of them is analyzing the vulnerability of a server.
- Programming: with Linux, you can do front-end and back-end development on your Android smartphone.
- Running Linux Software: many amazing Linux software that you can use such as Inkscape, GIMP and other software.
How to Install Linux Distro on Android
Required Applications
Before we install the Linux distro, we need some necessary applications. Here's the list.
1. Termux latest version

If we install Termux from the Play Store, that version has been abandoned and cannot be used for some functions. The Termux developers said this happened due to several Play Store policy factors.
Don't worry, you can still install the latest version of Termux via GitHub or F-Droid, which you can get from the following links:
Although not from the Play Store, the application is safe and harmless.
2. Andronix

There are many applications that can install Linux distros on Android, but Andronix is the best according to us. Some advantages we found in Andronix:
- Easy to use: all documentation is clear on their website:
- Many distro choices: various popular distros are available for installation, such as Kali Linux, Debian, Ubuntu, Manjaro, Fedora, Arch Linux, Void, and Alpine.
- Desktop Environment: for GUI display issues, Andronix has a variety of choices for that.
3. VNC Viewer (optional)

For the VNC Viewer application, you are free to use any. This application is needed to access the display of the Linux distro. You can also choose not to install it if you only want to use the CLI-only version of the Linux distro.
Linux Installation Process

If all the necessary applications have been installed, then open Andronix and you will see a display like the one above. Please select the Linux distro you want to install on your Android phone. We recommend choosing Ubuntu if you are a beginner, so tap on the orange-yellow icon.
The Modded OS version is a premium version that has been optimized to run on Android. You need to pay to use it. The regular version is also good!

The image above is part of the Ubuntu page in Andronix. Please click "Continue" with the orange button, which will then change to something like the image below. It might be slightly different if the chosen Linux distro is not Ubuntu.

Here we chose version 20.04, which is newer and has new features. Please click on that version, and the following display will appear.

Then click the download button, which will proceed to the GUI display selection process as shown below.

There are several GUI options that can be installed: Desktop Environment, Window Manager, or CLI Only. Currently, we choose the desktop environment. Besides being accessible via CLI, it can also be accessed via VNC Viewer.

Several desktop environments must also be selected in this section, depending on your preference. However, we chose XFCE, as it is lightweight and easy to use. After clicking, the command needed to install Linux on Android will be automatically copied, as indicated by the image below.
Currently, the command has been copied to the clipboard on your phone. Now open Termux and paste the code by clicking and holding the screen, then the paste option will appear. The pasted command will be something like this:
echo "deb https://termux.mentality.rip/termux-main stable main" > $PREFIX/etc/apt/sources.list && cat $PREFIX/etc/apt/sources.list && pkg update -y && pkg install wget curl proot tar -y && wget https://raw.githubusercontent.com/AndronixApp/AndronixOrigin/master/Installer/Ubuntu20/ubuntu20-xfce.sh -O ubuntu20-xfce.sh && chmod +x ubuntu20-xfce.sh && bash ubuntu20-xfce.sh
or if in the Termux application, it will look like the following image.
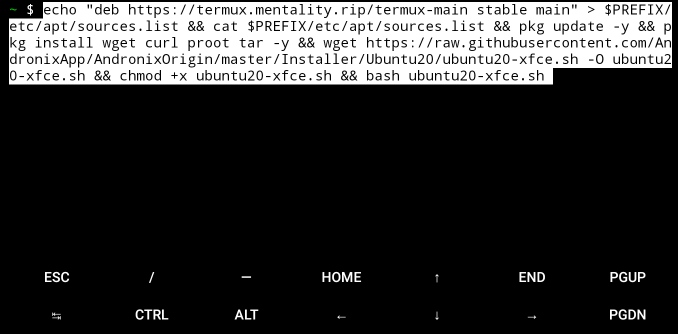
Please press enter to start the installation process. Make sure your network signal is stable. Although the memory required is less than 4 GB, to be safe, clear 8 GB of memory so that it doesn't freeze when running.
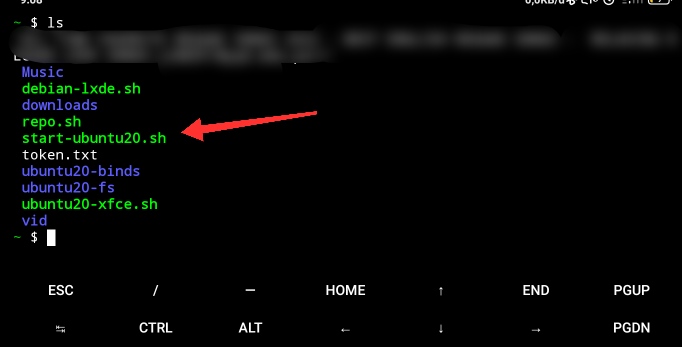
Wait until the installation process is complete. If it is, you can check by using the following command in the Termux application.
ls
If the file start-ubuntu20.sh exists, then you have successfully installed the Linux distro on your Android phone. The file name may vary depending on the distro and version chosen, but the characteristic is start-[distro_name][distro_version].sh.
We have performed the installation process before this article was written, so we are not displaying the process in Termux.
Access Linux Distro with VNC Viewer
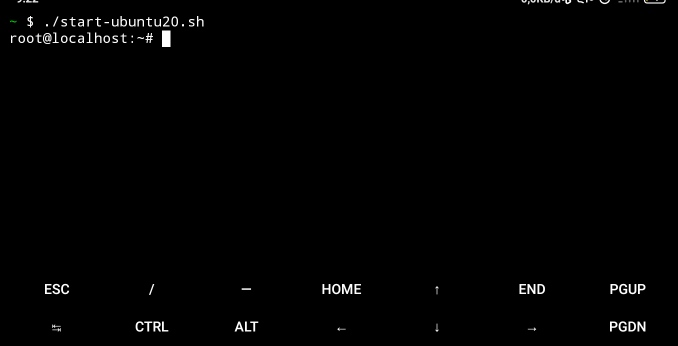
Now we have successfully installed the Linux distro on Android, but to access the GUI display, we need the VNC Viewer application. Before that, make sure you run the Linux distro first with the following command in Termux.
./start-ubuntu20.sh
Because we chose another distro, just type ./start-[distro_name][distro_version].sh. Here's the display.
Now run the VNC server on the installed Linux distro with the command vncserver-start. If it's your first time, you will be instructed to set a password. Please follow the instructions. If you're done, let's proceed to the next step.
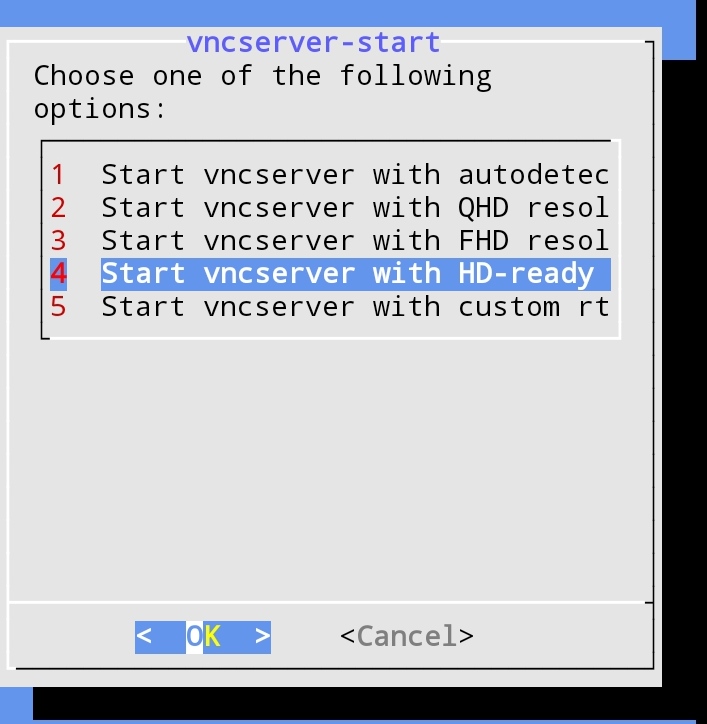
Here we are presented with various screen resolution options. We chose number 4. Use the up and down arrow keys to move the selection or type a number between 1-5, then press enter.
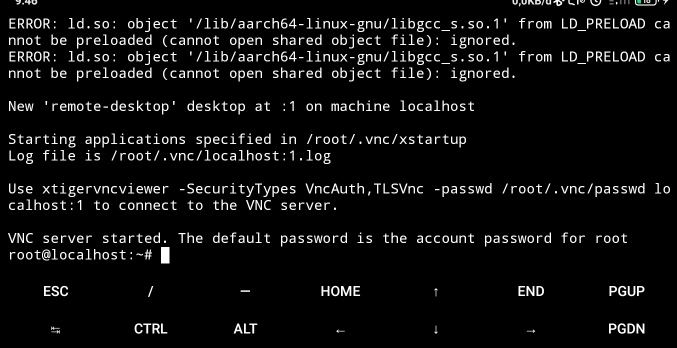
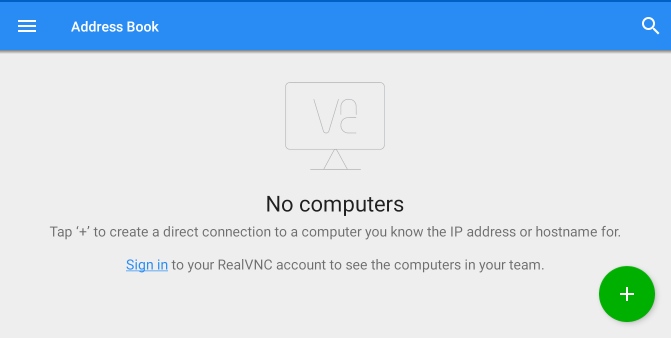
If an image like the one above appears, then you have successfully started the VNC server. Now open the VNC Viewer application and press the + button as follows.
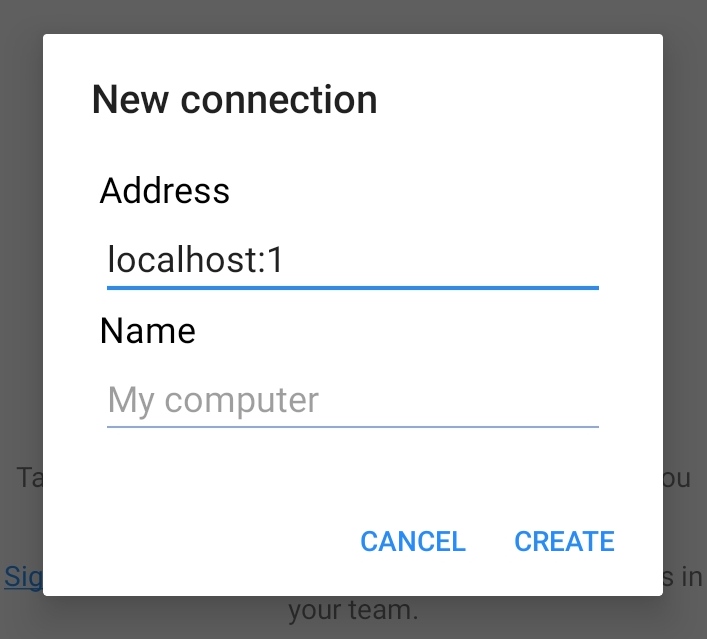
Then a popup will appear. Fill in the address with the address of the Linux VNC server that we installed earlier with localhost:1, then tap create.
A green button with the text "Connect" will appear. Please tap that button. If a "Unencrypted Connection" warning appears, you can ignore it by tapping OK. Then a display for entering the password will appear as follows.

Enter the password you set, then tap continue. If a display like the one below appears, then you have successfully accessed the Linux distro that has been installed on your Android.

Final Words
After successfully installing the Linux distro on Android without rooting, you can now access Linux according to your needs.
Many things can be done with Linux, but never use it for illegal purposes.