How to Create a Related Articles Widget With Blogger API

Related Articles in Blogger must be created manually and cannot be done through the layout. To create it, you need a Blogger API Key because we will use the Blogger API, as well as JavaScript for the widget to work.
Function of Related Articles Widget
The Related Articles widget functions to direct visitors to articles related to the one they are currently reading. If visitors are interested in the related articles we provide, they will read our other articles. This will increase our session duration, which of course affects SEO.
Why Use Blogger API?
Why not use a URL feed? The reason is that the Blogger API resource size is smaller compared to a URL feed. A URL feed automatically includes the content of the article, making it larger compared to the Blogger API, which can be modified not to display article content.
How to Create
Before creating, you must already have a Blogger API Key, which you can learn how to get in How to Create a Blogger API KEY. This is because the Blogger API cannot be used without an API key. It is recommended to back up your template first.
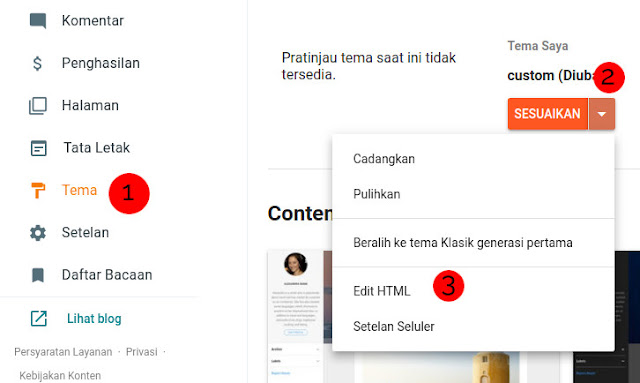
Now go to Blogger > Theme > Click next to Customize > Edit HTML.
Copy and paste the following code above the </b:skin> or </style> tag.
/*Related Articles Widget by Nurhidayat.web.id*/.related{height:max-content;margin-bottom:1rem;position:relative}.scroll{background-color:transparent;overflow-x:auto;white-space:nowrap;padding-top:.3rem;padding-bottom:.3rem}.scroll .card{display:inline-block;margin-right:.5rem;border:1px solid rgba(0,0,0,.1);box-shadow:0 .1rem .5rem rgba(0,0,0,.1);border-radius:.25rem;width:240px;background-color:#fff}.scroll .card:last-child{margin-right:80px}.scroll .card-img-top{width:100%;display:block;border-top-left-radius:.25rem;border-top-right-radius:.25rem}.scroll .card-title{white-space:normal;font-size:16px;margin-top:0}.scroll .card-title a{color:#4a4a4a}.scroll .card-body{display:flex;flex-wrap:wrap;padding:.5rem 1rem}.scroll .small{color:#000;font-size:14px;opacity:.7}
Now find the Blog widget as follows:

Copy and paste the following code between <b:includable> as shown in the image.

<b:includable id='postRelated'>
<div class='related'>
<h3 class="title">Related Articles</h3>
<div class="scroll" id="parse">
<div class='card'>
<div class='card-body'>
<div style='padding: 5rem 0;'>
<span class='card-title'>Loading..</span>
</div>
</div>
</div>
<div class='card'>
<div class='card-body'>
<div style='padding: 5rem 0;'>
<span class='card-title'>Loading..</span>
</div>
</div>
</div>
<div class='card'>
<div class='card-body'>
<div style='padding: 5rem 0;'>
<span class='card-title'>Loading..</span>
</div>
</div>
</div>
</div>
</div>
<script>
let imgsize = "w280-h140-p-k-no-nu";
api = "XXXXXXXXXXXXXXXXXX";
label = [<b:if cond='data:post.labels'><b:loop index='l' values='data:post.labels' var='label'>"<data:label.name/>",</b:loop></b:if>]
maxres = 10;
noimage = "https://fiik346.github.io/img/noimage2by1.svg";
const api_url =
new URL("https://www.googleapis.com/blogger/v3/blogs/<data:blog.blogId/>/posts");
/*Related Articles by Nurhidayat <![CDATA[*/async function getapi(e){const a=await fetch(e);show(await a.json())}function show(e){let a="";for(let t of e.items){let e="";if(void 0!=t.images){for(z of t.images)var s=z.url.split("/");z.url.includes("bp.blogspot.com")?e+="https://"+s[2]+"/"+s[3]+"/"+s[4]+"/"+s[5]+"/"+s[6]+"/"+imgsize+"/"+s[8]:e+=z.url}else e+=noimage;let l=t.title;t.title.length>35&&(l=t.title.slice(0,35)+"...");let i=t.published,r=i.substring(0,4),n=i.substring(5,7),c=i.substring(8,10),o=new Array;o[1]="Januari",o[2]="Februari",o[3]="Maret",o[4]="April",o[5]="Mei",o[6]="Juni",o[7]="Juli",o[8]="Agustus",o[9]="September",o[10]="Oktober",o[11]="November",o[12]="Desember",a+=`<div class="card">n <a href="${t.url}" class="d-block"><img class="card-img-top" src="${e.replace(//s[0-9]/,"/"+imgsize)}" alt="${t.title}"/></a>n <div class="card-body">n <h3 class="card-title"><a href="${t.url}">${l}</a></h3>n <span class="small">${c+" "+o[parseInt(n,10)]+" "+r}</span>n </div>n </div>`}document.getElementById("parse").innerHTML=a}api_url.search=new URLSearchParams({key:api,fetchBodies:!1,fetchImages:!0,maxResults:maxres,labels:label[Math.floor(Math.random()*label.length)]}),getapi(api_url);/*]]>*/
</script>
</b:includable>
For the XXXXXXXX part that I marked, please replace it with your API Key. If you don't have an API key, you can read How to Create a Blogger API KEY.
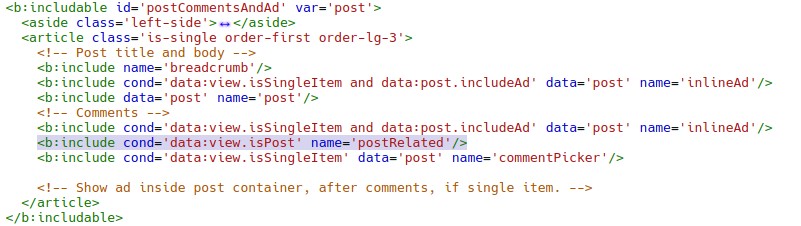
Now paste the following code:
<b:include cond='data:view.isPost' name='postRelated'/>
in the section:
<bincludable id='postCommentsAndAd' var='post'>
right above the code:
<b:include cond='data:view.isSingleItem' data='post' name='commentPicker'/>
See the following image for more details:
Now click save in the top right button, and check your blog article to see if the related articles widget is displayed.
Good luck, if there are any errors, please comment.